Monday, August 26, 2013


Hey there fellow scrappers!!!
So the creative juices have been running non stop, since returning from
Camp Mojo the other weekend. This week I'm going to show you how to incorporate your
Project Life cards (c'mon I know you've brought some!!) into a traditional 12x12 layout! 

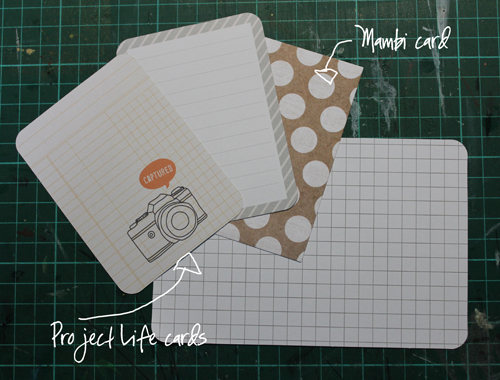
I've started with a 6x4 Project Life grid card, then 2 other 3x4 cards from PL collections
(I have no idea which ones sorry) & then one more 3x4 card from Mambi
(gratiful set - I think LOL)
 I've grabbed a sheet of kraft cardstock & smeared a little gesso over it.
 I had a piece of scrap paper & a doily in my draw which I decided to use also.
I then began arranging my PL cards on my page. I've used a posca pen to
doodle on & around these...
And with a little more doodling, a title & I'm done!!!
Close up shot...
You don't have to purchase full PL core kits to get PL cards!
At the SFS shop, Peta has Mambi themed card packs for $5 or
1/3 PL card packs (depending on availabilty) for $12!!!!
So why not get a pack to try your hand at using them in a tradition 12x12 layout :)

 Here's my layout I did for SFS August Colour Challenge. I've also used PL cards on this layout too. Some from PL, Mambi & Elle's Studio!!
Hope you entered a layout or 2 in any of the 3 challenges or if not have
a go at next months!! The link for these is HERE.
Thanks for popping by & make sure you head over to the shop for
any of your scrapping needs. 
Neet xox

August Step by Step - By Donna

I was so excited when I opened a parcel from Peta this week when I saw that she sent me some Gelatos!
 I knew instantly that I had to use them for this months step by step. 
After lots of trolling through YouTube I found HEAPS of tutorials to show me how to use them.

Aren't they gorgeous!
Ok, enough drooling! 
Here is a step by step showing you how I used the gelatos on my layout.

To start with I used some gesso to seal my cardstock. If you don't, the gelato's will just seep into the cardstock and disappear. I am a pretty impatient scrapper so I then used my heat gun to dry it. I then picked a gelato colour that matched the papers that I wanted to use and then scribbled on the area where I wanted to add the colour too.


I used my water brush (you could use a paint brush dipped in water if you don't have one) to blend the scribble together. 
I wasn't happy with the with the depth of colour that I had so after I had dried it with my heat gun, I added more of the colour over the top. I then sprayed it with a water spray bottle (which I stole out the girls bathroom sssshhhh!) 
It did make it really wet, but I accidentally tipped the cardstock up and it made the gelato starting running down the page... loved it!


After having so many wet products on your page it tends to buckle. I have found that if you turn it over and hit it with the heat gun to dry the other side it flattens down nicely.


To give my page some more depth I stamped randomly over the background. While I had the gelatos still out I thought I would see how they work with the Pink Paisley 'Artesian Chipboard' that I had in my stash. I just scribbled over it and then used my finger to rub the excess off so the embossed image comes through.


I spent some time shuffling papers to pick which ones I wanted to use out of the Carta Bella 'Hello Again' collection kit that I received from Peta for my DT kit this month. 
I don't plan a layout, I just go with what the papers 'tell' me. But I do start with some inspiration from Pinterest, not that it looks anything like it when I am finished hee hee.
After I pick what papers I want to use I cut 'random' sizes that I will use for layering. And then shuffle them around until I am happy with them.

I have never been one to have a 'flat' layout and I like seeing the different layers. So after a bit of crumpling I start to stick it all down. I only put tape in the middle of the layers so that it doesn't squash them down and it makes it easier to add the embellishments to the layout later. And I nearly always use some sort of foam tape to the back of the photo to give it more 'lift'


And the best part of using a collection kit is that the embellishments are all there for you. Pick which ones you want to use and stick them down!

Add a title and you are done!


Peta has more gelatos on the way to the store in the next week or so... keep an eye out on the facebook page to see when they arrive!

Thanks for popping by!
Donna xxx

Wednesday, August 21, 2013

Using the Heidi Swapp Tiny Hearts & Confetti Stencil


Hello Everyone!

It's my turn to WOW you - boy did that time fly by!!! Seems like yesterday... so much so that it just crept up on me!

This time around I wanted to have a play with some Heidi Swapp goodies that I received from Peta - the awesome Heidi Swapp Stencils!!

I used the

Heidi Swapp 12x12 Tiny Hearts Stencil

for this layout:


Firstly I started with getting out my Mr Huey's Color Mists


I sprayed a few times on White Cardstock like so...


and I've then layed the Tiny Heart Stencil over the top of the page, and smeared White Modelling paste over the top with a spatula...


peeled it off to reveal this...

 I have then got out my heat gun to quickly dry the modelling paste and give a bit more 3 dimension...


I have then used the White Color Mist to lighten it up a bit...

I have outlined some of the hearts using the Becky Higgins Project Life Pen, to give them a bit more definition and make them a bit more noticeable...


I found the Echo Park Here & Now Kit was perfect for the colours that I used for the background...


I have also used the Jillibean Soup alpha stickers and American Craft Thickers...


 Here's some other layouts I have created using the HS stencils...


 I have also used the Heidi Swapp Confetti Stencil


With this one I have partly misted cardstock...


and this layout below I have firstly misted, and then have used modelling paste, but not used ALL the tiny hearts, just randomly used some of them.

I have done the same thing in this layout below too..

I hope I've inspired you to use your Heidi Swapp stencils a little differently!

Happy Scrapping!

xo Charm

Wednesday, August 14, 2013


Hi girls, it Donna here. It is my turn for What's on Wednesday and I am going to share some techniques for altering some wood veneer that I am sure we have all got in our stash. 


I LOVE using these embellies on my layouts, but sometimes they need just a pop of colour.

A quick and easy way is to cover the veneer is with washi tape. I am sure that we all have a large stash of that hee hee.

I didn't really like the sentiment on this tag so I flipped it over and used the other side.

 
I then used a craft knife and mat to trim the edges and then a sanding block to tidy it up.


I then used a stamp and some stazon ink to add some words to the banner.


Another way I like to alter the veneer is to ink and clear emboss them.


In my previous life I was a card maker and I have lots of ink pads and embossing powders. As I am impatient, I use them as the transformation is fairly instant. 


You can also use Dimensional Magic to do the same thing.

I permanently have a messy mat on my desk for projects just like this. I have had this one for years and I have recently discovered that Ranger has brought out a messy mat as well. They are out of stock in the shop at the moment but Peta has some on back order.. 


I have one of these in my scrap tote.. perfect for taking to retreats or crop days!

Sorry I haven't added any links for products to the shop as it is closed at the moment while Peta is packing to head to Mojo in the morning. Lucky girl! I wish I was going too :(

Don't forget to call back in a few days. I am doing a layout for you with step by step instructions using the new Carta Bella 'Hello Again' Collection kit that has just arrived at the shop. 

And of course I will be using the wood veneer that I have altered as well!


Happy Scrapping!


Friday, August 9, 2013

A day of winners!

Did you join in my Facebook competition last weekend? We had huge 145 shares! AND our followers reached over 1000! A big thank you for all of you that shared and a big hello to all of our new followers.

Our lucky winner (by random draw) of the $40 SFS voucher is Nicole Kyriazis. 

And while I was on a spending spree with Peta's money, I thought I would also give away a $20 voucher for our 1000th liker. 

And the lucky scrapper is Fiona Johnson! 

Congratulations Ladies!

And while we are talking about winners we have also drawn the winner of the June and July Challenges.

June - Lisette for her sketch challenge
July - Annette Pearce for her colour challenge

A big thank you to you all for joining in our challenges.

If you are looking for some inspiration over the weekend the Design Team have their challenges up on the forum. 

Looking forward to seeing your layouts in the gallery!

Tuesday, August 6, 2013

What's on Wednesday


Peta here to show you a quick tutorial on backgrounds with ink

You will need -
***art journal or a few pieces of card stock
***some inks - I have used Versa Cube Inks 
***Mask - The Crafters Workshop Arrow Template
***baby wipes


Rub the ink down the template 
- you don't need to worry if all areas are covered
 I have used the 3 inks next to each other
 Take your baby wipe and wipe all the ink over the template
this will then transfer onto your page

Depending on how much ink you use will depend on the 
colours that will come thru - see the difference in the 
two pages below


now grab the template and a clean page or paper and re wipe your template
using the dirty wipe first and then get a clean one and create a new
page and clean your template all at once.


 So that was easy right....
I use this "wipe technique" on all my masks after I have used them to create
backgrounds in my art journal 


so happy background experimenting everyone :)

NB: you can purchase all these items in the shop [not the babywipes;)]


Saturday, August 3, 2013

August Challenges

Are you having a scrappy weekend? Peta and the Shop are at retreat at the Beautiful Summerland Point with a group of amazing ladies. So, for the rest of us that are home and looking for some amazing challenges to get that mojo flowing the DT have some just the thing for you.

Anita's Colour Challenge

Charm's sketch challenge

Donna's quote Challenge

Looking forward to seeing you layouts in the gallery

Don't forget to pop over to our FACEBOOK page and share the photo of be in the running for a $40 voucher to spend in the shop!


* enjoy * create * share *